Hello World
Overview
This is a tutorial on outputting the string 'Hello World' using NDCLI.
Develop a command line extension that outputs 'Hello World' to standard output when the command is executed from NDCLI.
Overall Flow
- Preparing the command line extension
- Implementing command processing
- Deploying to the execution environment
- Executing the command line extension
Public Sample
- The complete source code created as a result of this tutorial is available on GitHub.
External link: Hello World
Goal Image
- When you run the HelloWorld output command line extension from NDCLI, the following message is output.
> ndcli HelloWorld
'Hello World'
Preparing the Command Line Extension
The following steps explain how to create a new command line extension project in Visual Studio and prepare a debugging environment for the command line extension.
- Creating a new project in Visual Studio
- Installing the NuGet package for command line extension development
- Creating a new class
This section explains the procedure for Visual Studio 2022 (hereinafter referred to as VS).
Creating a New Project in VS
To create a new command line extension project, follow these steps:
- Launch VS and click "Create a New Project" from the start page to open the "Create a New Project" wizard.
- Select "Class Library" in C# from the project templates and click the "Next" button.
- In "Configure your new project," enter the information according to the table below and click the "Next" button.
- In "Additional Information," select "Framework" according to the table below and click the "Create" button.
- This will create a new VS project template for developing a class library in C#.
- Of the template files, the
Class1.csfile will not be used. Delete it from the VS Solution Explorer.
| Item | Value |
|---|---|
| Project Name | HelloWorldCliExtensionSample |
| Location | Any parent folder to store the entire project |
| Solution Name | HelloWorldCliExtensionSample |
| Framework | .NET Standard 2.0 |
- The project name must contain the string "CliExtension."
- For details on project settings, see the next page.
- Development Method > Developing Command Line Extensions > Project Settings
Installing Packages
To install the NuGet packages required for command line extension development, follow these steps:
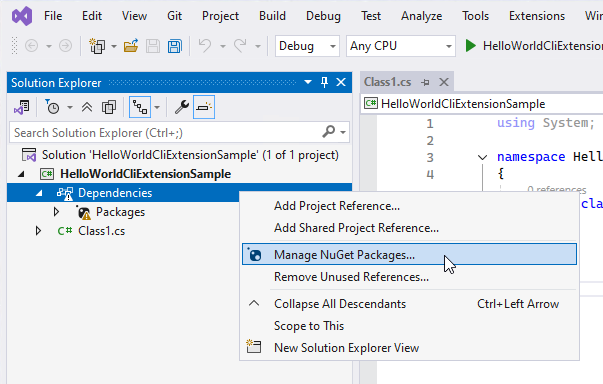
- In Visual Studio Solution Explorer, select the project's Dependencies and select Manage NuGet Packages from the context menu.
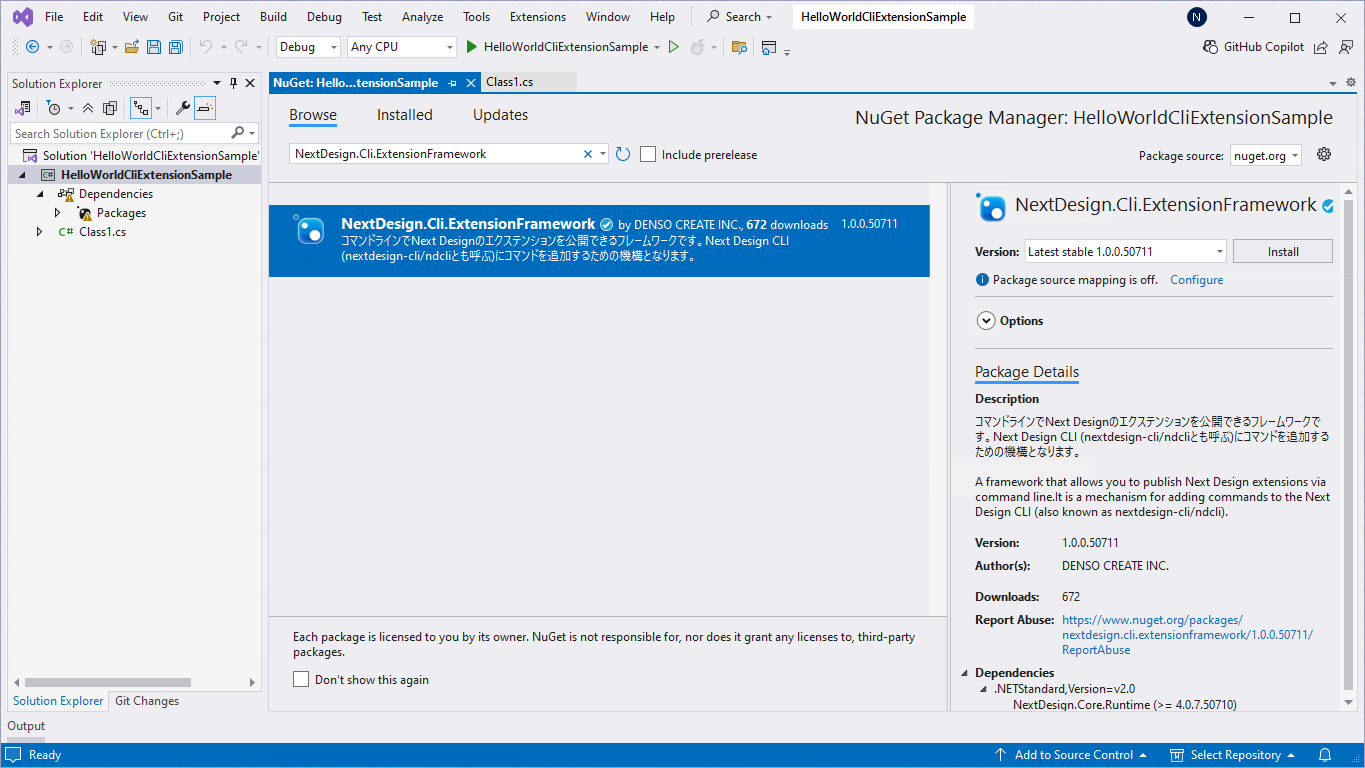
- Ensure that the package source is set to
nuget.org, and search for the package by typingNextDesign.Cli.ExtensionFrameworkin the Reference tab. - Install the following package from the listed packages:
NextDesign.Cli.ExtensionFramework
Build Settings
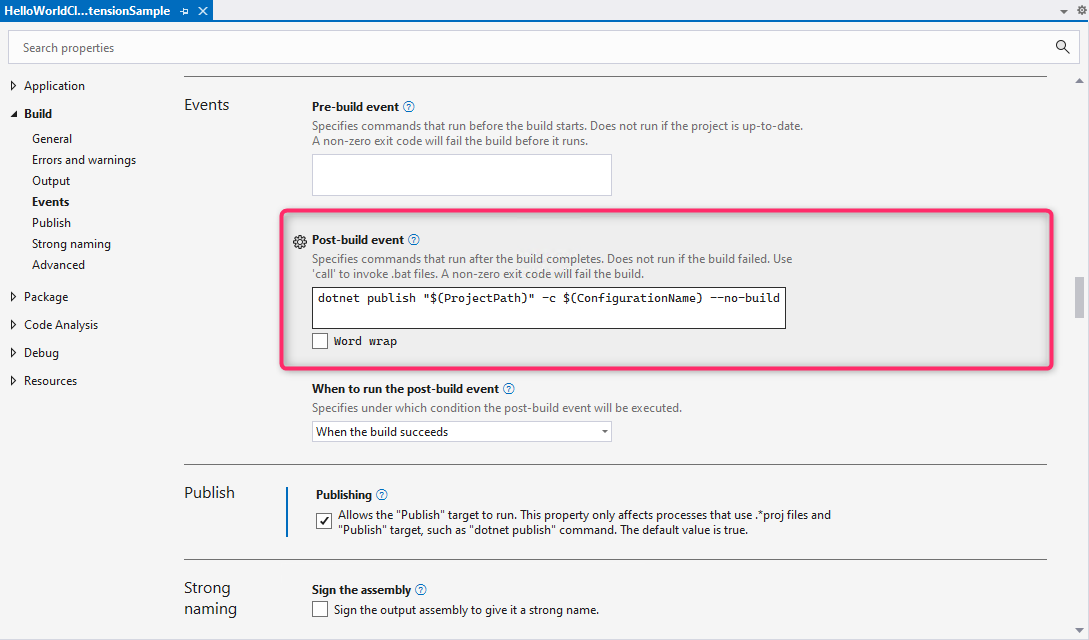
Set the following command in Visual Studio's post-build event:
dotnet publish "$(ProjectPath)" -c $(ConfigurationName) --no-build
Creating a New Class
To create a new class named HelloWorldCliExtensionSample as a new item in your VS project, follow these steps:

-
Right-click the VS project in the VS Solution Explorer and select [Add] > [Class] from the context menu.
-
Ensure [Class] is selected as the type of item to add, enter
HelloWorldCliExtensionSamplein the [Name] input field, and click the [Add] button. -
This will create a new
HelloWorldCliExtensionSample.csfile template, which will also appear in the VS Solution Explorer.
Implementing Command Processing
To implement the command line extension entry point and 'Hello World' output processing, implement the following in the class created with Create a New Class.
- Declares the namespace of the API to reference.
- A class that inherits the
ExtensionBaseclass, which serves as the entry point. - A command handler for 'Hello World' output processing.
Implementation Example
HelloWorldCliExtensionSample.cs
using NextDesign.Cli.ExtensionFramework;
using DensoCreate.Cli.Framework;

namespace HelloWorldCliExtensionSample
{
    public class HelloWorldCliExtensionSample : ExtensionBase
    {
        ///<summary>
        ///Constructor
        ///</summary>
        public HelloWorldCliExtensionSample() : base("HelloWorldCliExtensionSample")
        {
        }
    }

    ///<summary>
    ///Implements the HelloWorld command.
    ///</summary>
    public class HelloWorld : Command
    {
        ///<summary>
        ///Constructor
        ///</summary>
        public HelloWorld() : base("HelloWorld", "Outputs 'Hello World'")
        {
            RegisterHandler(nameof(OnExecute));
        }

        ///<summary>
        ///Handler execution
        ///</summary>
        private void OnExecute()
        {
            Console.WriteLine("'Hello World'");
        }
    }
}
Deployment to the execution environment
The set of files output to the publish folder as a build result is stored in the following folder.
- Windows version:
"%HOMEPATH%\AppData\Local\DENSO CREATE\Next Design CLI\extensions\HelloWorld\" - Linux version:
"$HOME/.local/share/DENSO CREATE/Next Design CLI/extensions/HelloWorld/"
Running the command line extension
Execute the following command from the command prompt to output 'Hello World' to standard output.
> ndcli HelloWorld
> 'Hello World'
License registration is required to run the command line extension. See the following page for details.