Batch Model Validation
Overview
This tutorial demonstrates how to perform arbitrary validation on model information input using a Next Design extension and display errors.
Let's create an extension using the .NET DLL method that adds a button to the ribbon. When this button is pressed, it performs batch validation on all models and displays the error locations.
Overall Flow
- Preparation of the .NET DLL development project
- Definition of extension points using a manifest
- Implementation of validation processing for all models
Public Sample
- The complete source code created as a result of this tutorial is available on GitHub.
External Link: ValidationSample-1
Goal Image
-
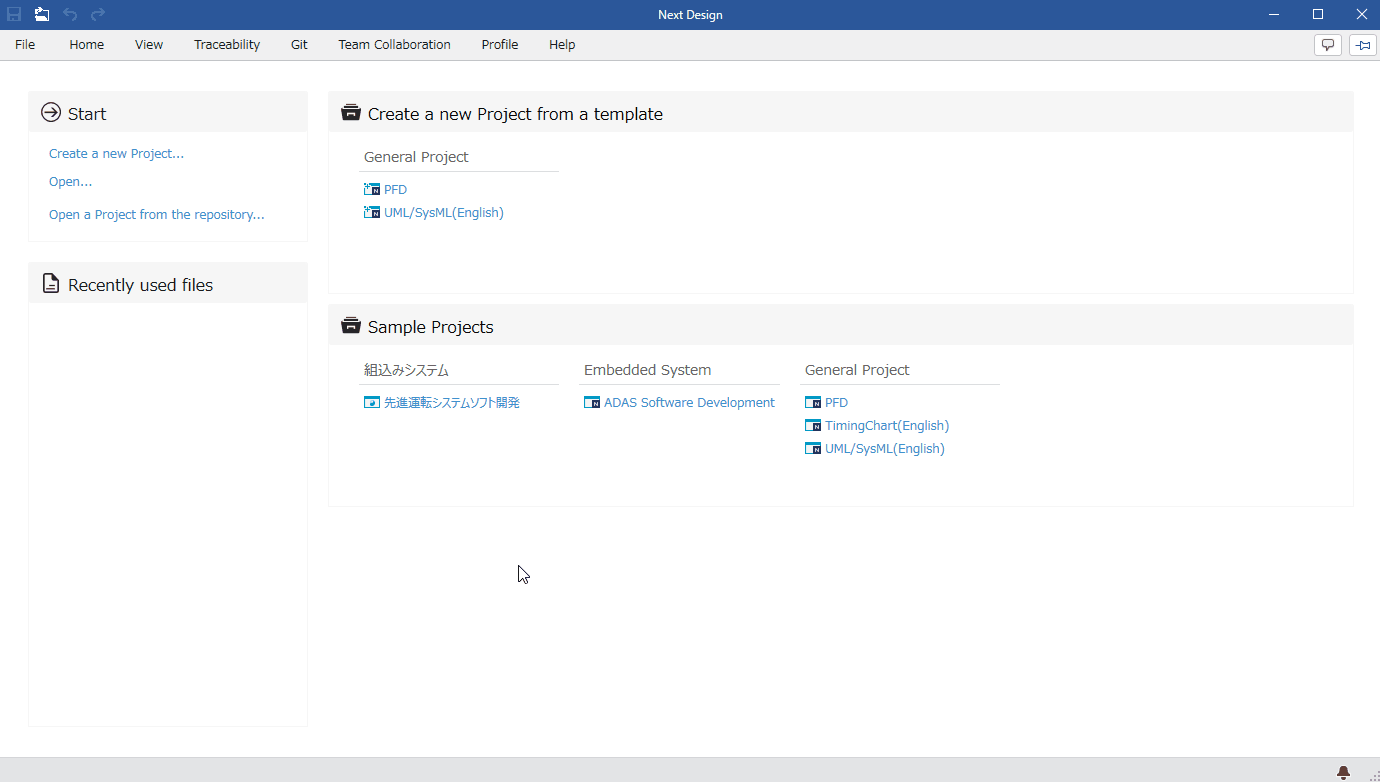
When you open the [Advanced Driving System Software Development] project from the Next Design sample projects, the [My Extensions] tab is added to the ribbon, and the extension functionality is enabled.
-
Clicking [My Extensions] > [Model Validation] > [Validation] button on the ribbon will batch validate all models according to the following validation rule, and errors will be displayed.
Validation Rule: Model names must not contain half-width spaces.
- To clear the displayed errors, click [Home] > [Model] > [Check Error] > [Clear Error] on the ribbon.
- If you cannot find [Advanced Driving System Software Development], please install the extension BasicSamples package.
For instructions on installing official extensions, please refer to here.
Preparing a .NET DLL Development Project
The following steps describe how to create a new .NET DLL development project in Visual Studio and prepare the extension debugging environment:
- Creating a new project in Visual Studio
- Installing the DLL for extension development
- Creating a new manifest file
- Creating a new class
- Adding icon files for the Ribbon UI
This section describes the procedure using Visual Studio 2026 (hereinafter referred to as VS).
Creating a New Project in VS
To create a new .NET DLL development project, follow these steps:
:::note: Procedure
- Launch VS and click [Create New Project] from the Start page to open the [Create New Project] wizard.
- Select [Class Library by C#] from the project templates and click the [Next] button.
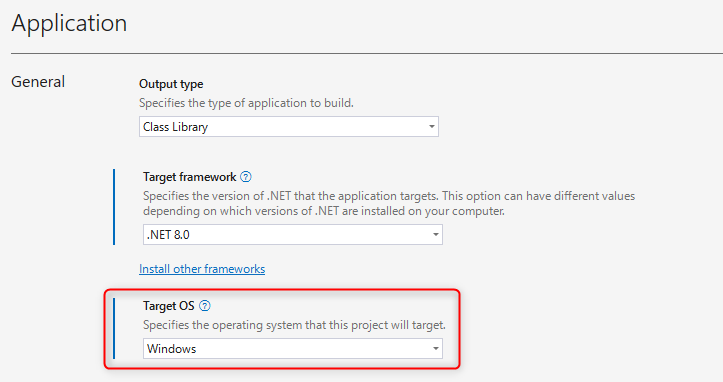
- In [Configure the New Project], enter the items according to the table below and click the [Next] button.
- In [Additional Information], select the [Target Framework] according to the table below and click the [Create] button.
- This will create a new VS project template for C# class library development.
- Of the files created as a template, the
Class1.csfile will not be used. Delete it from VS Solution Explorer.
:::
| Item | Value |
|---|---|
| Project Name | ValidationSample |
| Location | Any parent folder that stores the entire project |
| Solution Name | ValidationSample |
| Target Framework | .NET 10.0 |
- The following package must be installed beforehand.
.NET 10.0 SDK
https://dotnet.microsoft.com/download/dotnet/10.0
Setting the Target OS
In the project properties, set the target OS to "Windows".
Installing DLLs for Extension Development
To install the NuGet packages required for extension development, follow these steps:
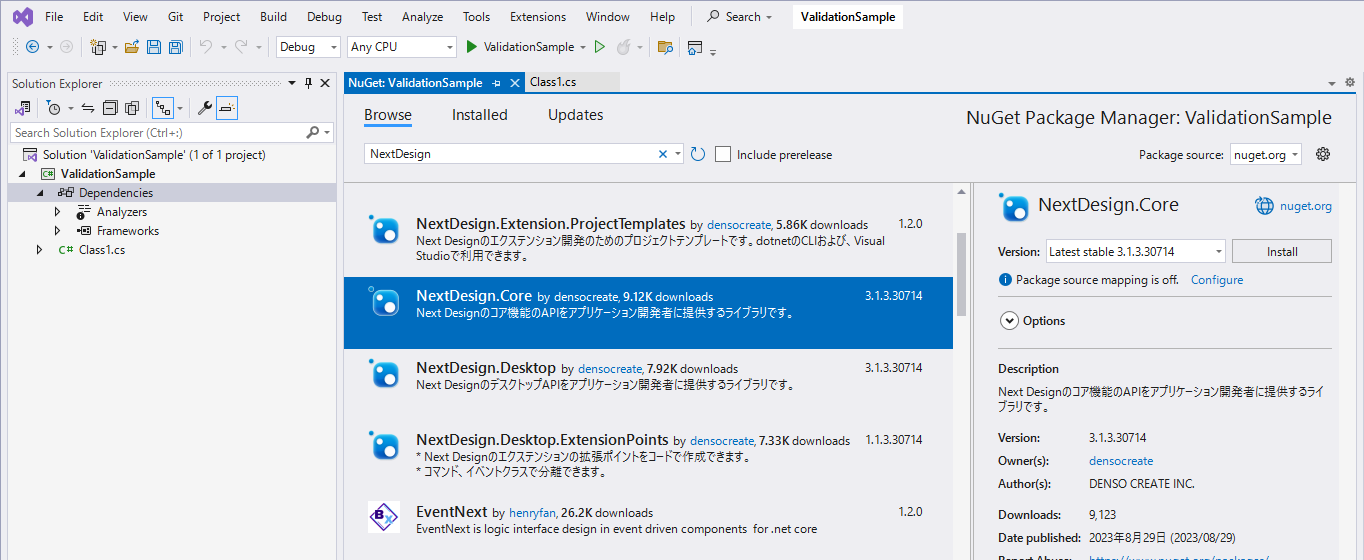
:::note: Instructions
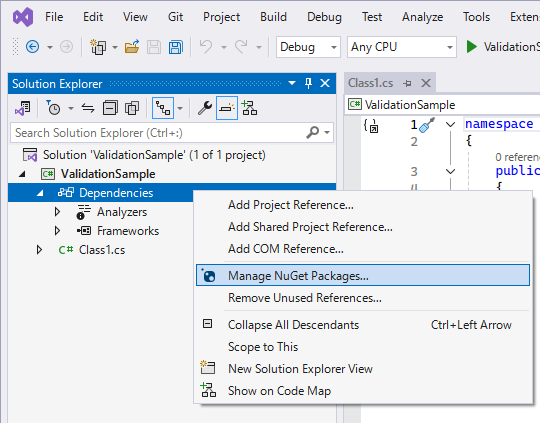
- From the Visual Studio Solution Explorer, select the project's [Dependencies] and run [Manage NuGet Packages] from the context menu.
- Confirm that the package source is set to
nuget.org, and search for the package by typingNextDesignin the [Reference] tab. - Install the following packages from the list:
NextDesign.Desktop
NextDesign.Core
:::
Creating a New Manifest File
To create a new text file, manifest.json, as a new item in your VS project, follow these steps:
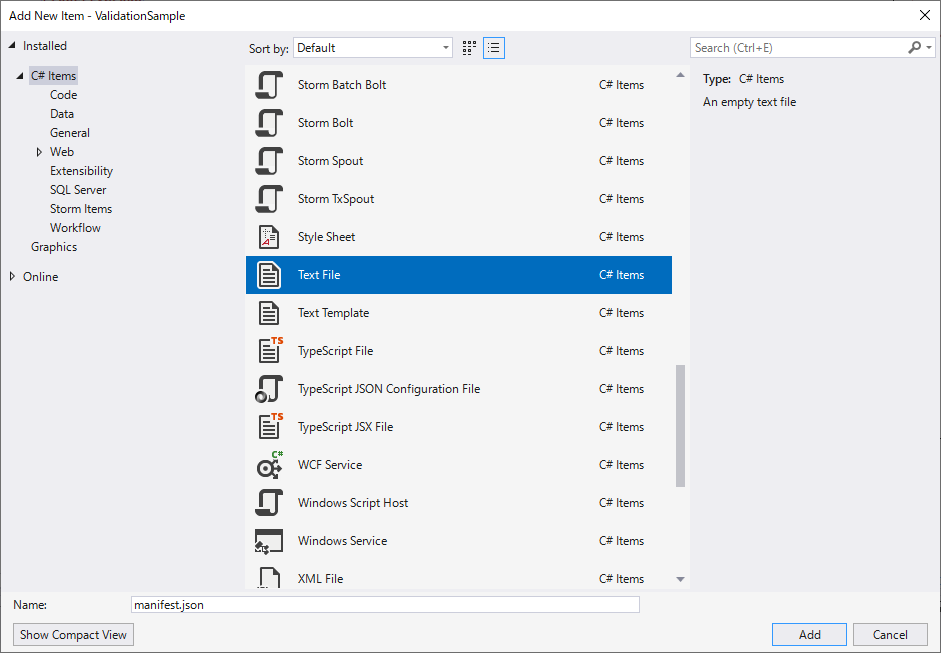
:::note: Instructions
- Right-click the VS project in the VS Solution Explorer and execute the [Add] > [New Item] command from the context menu.
- Select [Text File] from the type of item to add, enter
manifest.jsonin the [Name] input field, and click the [Add] button. - This will create a new empty
manifest.jsonfile, which will also appear in the VS Solution Explorer.
:::
Creating a New Class
To create a new class as a new item in your VS project: ValidationSample, follow these steps:
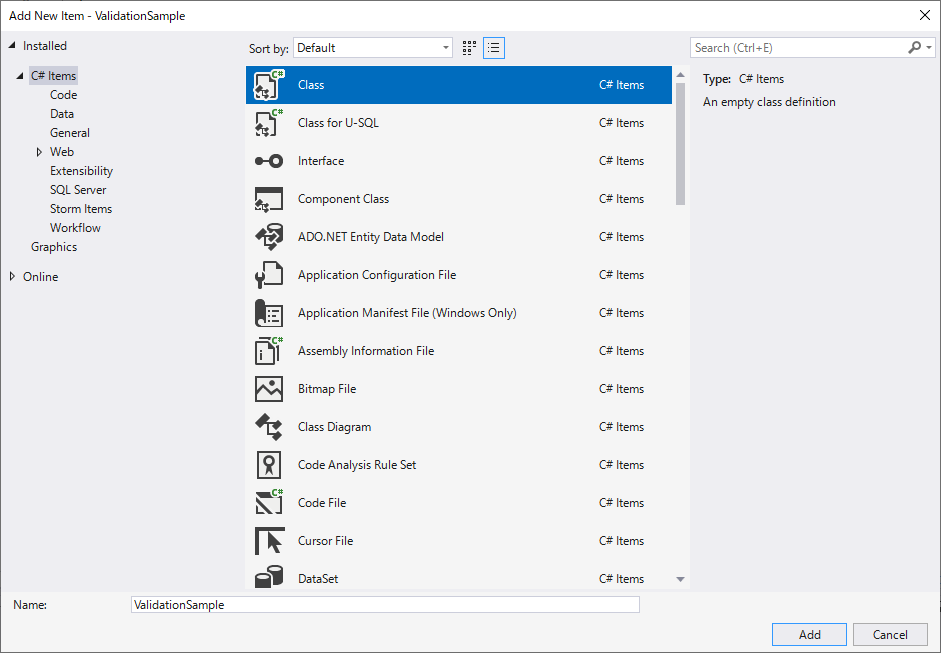
:::note: Instructions
- Right-click the VS project in the VS Solution Explorer and select the [Add] > [Class] command from the context menu.
- Ensure that [Class] is selected as the type of item to add, enter
ValidationSamplein the [Name] input field, and click the [Add] button. - This will create a new template file,
ValidationSample.cs, which will also appear in the VS Solution Explorer.
:::
Adding Icon Files for the Ribbon UI
To add the icon file for the validation run button, icon.png, to your VS project, follow these steps:
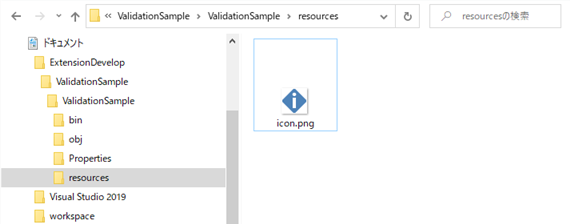
:::note: Instructions
- Create a
resourcessubfolder directly under your VS project. - Place the
icon.pngfile in the created subfolder.
(A sampleicon.pngfile is included in the publicly available sample solution.)
:::
Defining Extension Points with a Manifest
To define extension points, define the following in the manifest created with Create New Manifest File:
- Definition of the entry point of the executable program
- Definition of the extension's lifecycle
- Specifying the target profile for the extension
- Definition of UI extension points (ribbon tabs, groups, buttons)
- Specifying the icon file for the UI
- Definition of command extension points
Implementation Example
manifest.json
{
//Extension Definition
"name": "Validation Sample",
"version": "1.1.0",
"publisher": "DENSO CREATE INC.",
"license": "Subject to the Next Design End User License Agreement. Copyright (C) 2019 DENSO CREATE INC. All rights reserved.",

"main": "ValidationSample.dll", //Specifies the DLL file name of the build result as the entry point.

"lifecycle": "project", //Specifies the project lifecycle as the lifecycle.

"baseprofile": "In-vehicle system software development", //Specifies the profile name as the condition for the target project.

//Extension Point Definition
"extensionPoints": {
//Ribbon
"ribbon": {
"tabs": [
//Defines the ribbon tabs to add for the extension.
{
"id": "MyExtensions.MainTab",
"label": "My Extensions",
"orderAfter": "System.Help",
"groups": [
//Defines the groups that separate the ribbon tabs.
{
"id": "MyExtensions.Validation.Group",
"label": "Model Validation",
"controls": [
//Defines the validation run button.
{
"type": "Button",
"id": "MyExtensions.Validation.RunButton",
"label": "Validation",
"description": "Validates all models.",
"imageLarge": "resources/icon.png", //Specifies the icon file for the UI.

"command": "Command.Validation.Run" //Specifies the ID of the validation command defined in the command described below.
}
]
}
]
}
]
},

/Command
"commands": [
/Defines the validation command that calls the validation process command handler `Run`.
{
"id": "Command.Validation.Run",
"execFunc": "Run", //Specifies the public method implemented in the entry point's main class.
"canExecWhen": {
"uiState": "ProjectOpened" //Specifies that the project must be open as a condition for the command to be valid.
}
}
],

/Event
"events": {
}
}
}
Implementing Validation Processing for All Models
To implement the extension's entry point and validation processing, implement the following in the class created with Create New Class.
- Declaration of the namespace of the API to be referenced
- Main class of the DLL that will serve as the entry point
- Command handler (public method) for the validation process
- Initialization and termination processes for the extension
Implementation Example
ValidationSample.cs
//Declaration of the namespace of the API to be referenced in extension development
using NextDesign.Extension;
using NextDesign.Core;
using NextDesign.Desktop;

///<summary>
///Main class of the DLL that will serve as the entry point
///</summary>
///<remarks>
///The main class of the entry point implements the `IExtension` interface.
///The handler is implemented as a public method of this class.

///</remarks>
public class ValidationSample : IExtension
{
    ///<summary>
    ///Command handler for the validation process
    ///</summary>
    ///<param name="context">Command context</param>
    ///<param name="parameters">Command parameters</param>
    ///<remarks>
    ///Implements the validation process command handler as a public method of the main class.
    ///</remarks>
    public void Run(ICommandContext context, ICommandParams parameters)
    {
        var app = context.App;
        var project = app.Workspace.CurrentProject;

        //Clears all previous errors.
        app.Errors.ClearErrors();

        //Displays the error list window.
        app.Window.IsInformationPaneVisible = true;
        app.Window.ActiveInfoWindow = "Error";

        //Iterates through all models in the project.
        var models = project.GetAllChildren();
        foreach (var model in models)
        {
            //Validate the model according to the validation rules.
            ValidateModel(model);

        }
    }

    ///<summary>
    ///Validates the model according to the validation rules
    ///</summary>
    ///<param name="model">Model</param>
    private void ValidateModel(IModel model)
    {
        //Compare against the following validation rules:
        //・Do not include spaces in the model name
        if (model.Name.IndexOf(" ") > 0)
        {
            //If the validation rules are not met, add error information to the corresponding model.

            var message = string.Format("The model name contains a space. Model name: {0}", model.Name);
            var error = model.AddError("Name", "Error", "Model naming convention check", message);
        }
    }

    ///<summary>
    ///Extension initialization process
    ///</summary>
    ///<param name="context">Execution context</param>
    ///<remarks>
    ///Even if extension initialization and termination processes are not required, empty `Activate` and `Deactivate` methods are necessary.
    ///</remarks>
    public void Activate(IContext context)
    {
        //Implement extension initialization processes, etc., as needed.

    }

    ///<summary>
    ///Extension termination process
    ///</summary>
    ///<param name="context">Execution context</param>
    ///<remarks>
    ///Even if extension initialization and termination processes are not required, empty `Activate` and `Deactivate` methods are necessary.
    ///</remarks>
    public void Deactivate(IContext context)
    {
        //Implement extension termination processes as needed.
    }
}