Distribution via Package Function
In addition to direct distribution via binary, extensions can also be distributed using the package function. Using the package function makes it easy for other users to use extensions, samples, and other content while maintaining version control. Packages can be distributed via Next Design Extensions.

Packaging and its Benefits
Packaging is the process of creating Next Design extensions as a distributable file format. This makes distributing and updating extensions extremely simple. The main benefits are as follows:
-
Easy installation and updates
-
Extensions can be installed, uninstalled, and updated with a single click.
-
Users can be notified on the Next Design screen when a new version is released.
-
Easy version control
-
Version control is easy because multiple versions of the extension can be distributed.
-
You can view package overviews and version-specific changes on the Next Design screen.
-
You can develop extensions that work with specific Next Design versions.
-
Distribution is possible without a dedicated server.
-
You can register your own package deployment folder, enabling simple distribution using network folders, GitHub/GitLab, Subversion, and other version control tools.
-
You can distribute profiles and samples.
-
You can distribute not only extensions, but also profiles and project templates.
Context
Prepare the tools and environment necessary for packaging. Skip if already installed.
NDExt is a command-line tool that assists in extension development. It can be installed simply by running the following command from the command prompt. This program requires the installation of the .NET 10.0 SDK (https://dotnet.microsoft.com/ja-jp/download/dotnet/10.0).
dotnet tool install --global NDExt
- Create an extension project using the Project Template in Visual Studio.
Executing the following command from the command prompt will register it as a Visual Studio template:
dotnet new --install NextDesign.Extension.ProjectTemplates
Creating a Package
There are several ways to create a package for a Next Design extension, but the simplest method is using Visual Studio and the command-line tool NDExt. Here, we will explain the setup method using Visual Studio in the following order:
-
Create an Extension Project in Visual Studio.
-
Set the package information in the Visual Studio project settings dialog.
In Visual Studio 2026, the dialog looks like this:

The following is a description of each property:
| Setting Item | Description |
|---|---|
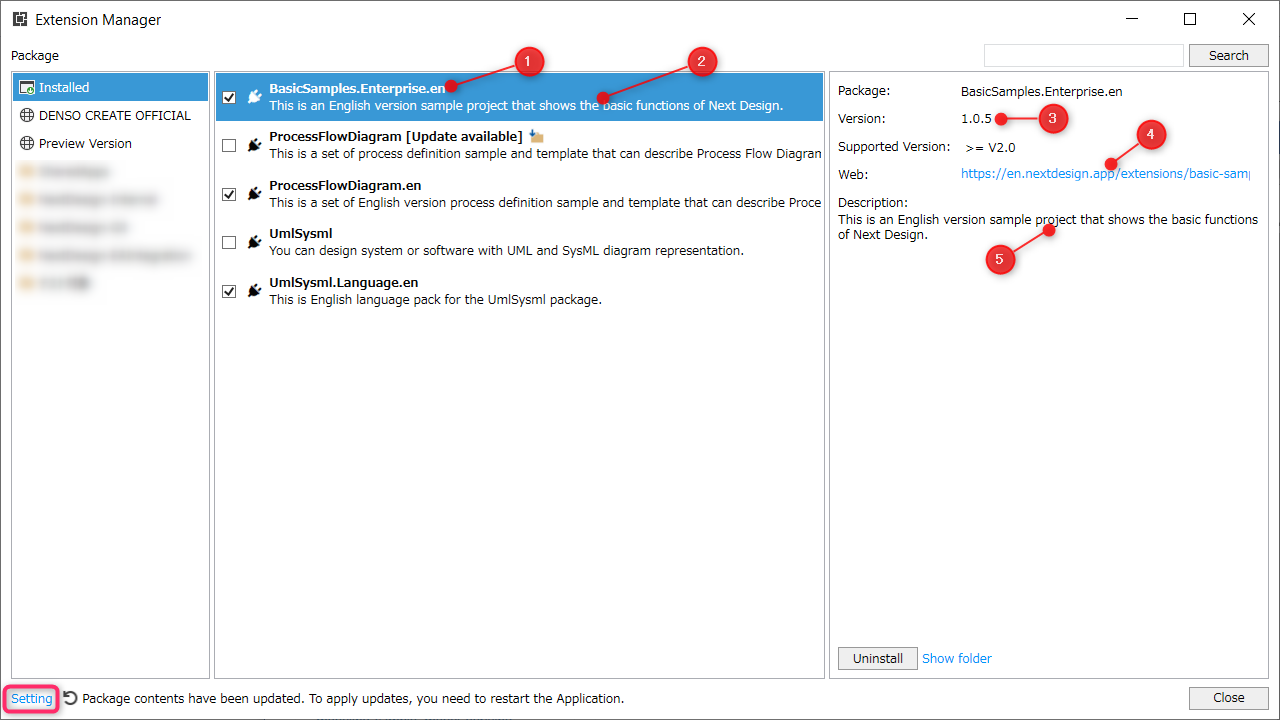
| Package ID | A unique name to distinguish the package. Specify it like "MyCompany.SomePackage". Use only letters, ., and numbers. This corresponds to ① in the diagram below. |
| Package Version | Used as the version to identify the package. For example, "1.0.0". This corresponds to ③ in the diagram below. |
| Author | Information about the package's creator. Please enter the company name, etc. |
| Description | Used for the package title and description. It can be any string. Only the first line is used for the package title, while the entire description is used for the package description. This corresponds to ② and ⑤ in the diagram below. |
| Project URL | The URL of the website related to the package. This corresponds to ④ in the diagram below. |
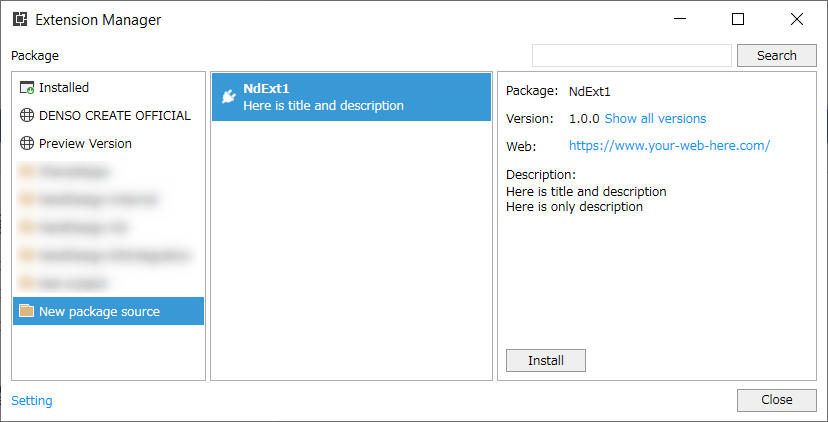
The [Packages] dialog will display as follows:
- Package IDs must be unique across all packages. Do not use Japanese names, as they will cause errors.
- The description property is used as the package title and description.
- When releasing a new version, update the
package version. If you created it as "1.0.0", update it to a larger number, such as "1.0.1". - If the version number format is not x.x.x (where x is any number), it cannot be disabled from Next Design after installation.
Building the Package
NDExt is used to build the package.
Executing the following command on the command line will find all extension projects (csproj) in the execution directory and its subdirectories, build them, and package them.
C:\MyProjects\NdExt1\NdExt1> ndext pack
- If the
ndext packcommand is executed successfully, a nupkg file will be created in the output folderndpackages. This file is the package file. - The package file is in the format
{PackageId}.{Version}.nupkg, such asNdExt1.1.0.0.nupkg. - The contents of the nupkg file are a zip file. This zip file contains the package definition file (nuspec file) and extension and profile files.
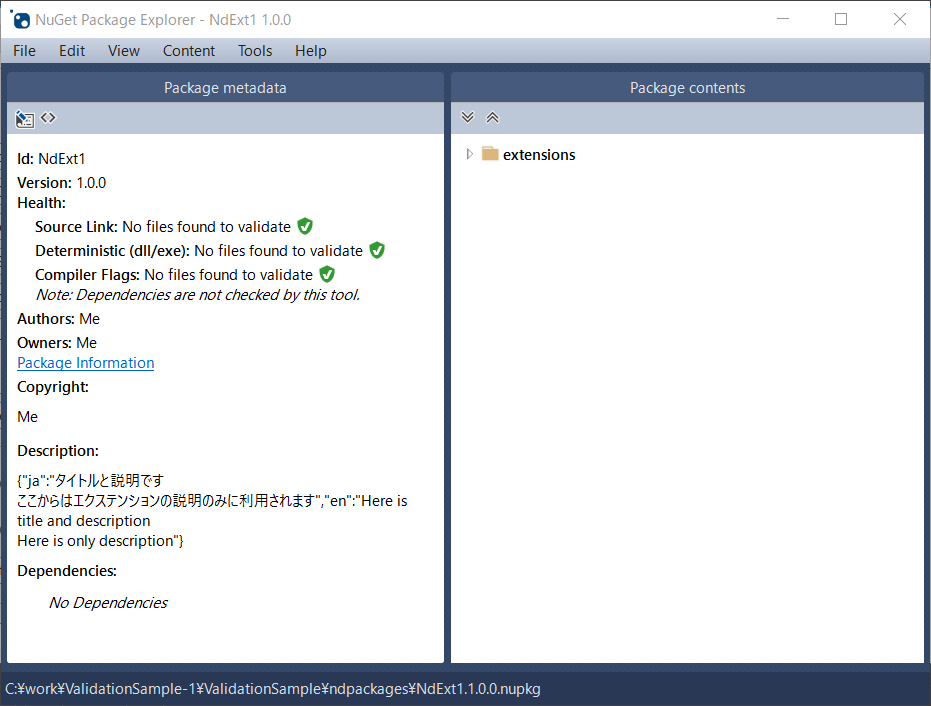
When you open the nupkg file with NuGet Package Explorer, a tool that can view and edit nupkg files, it will look like this:
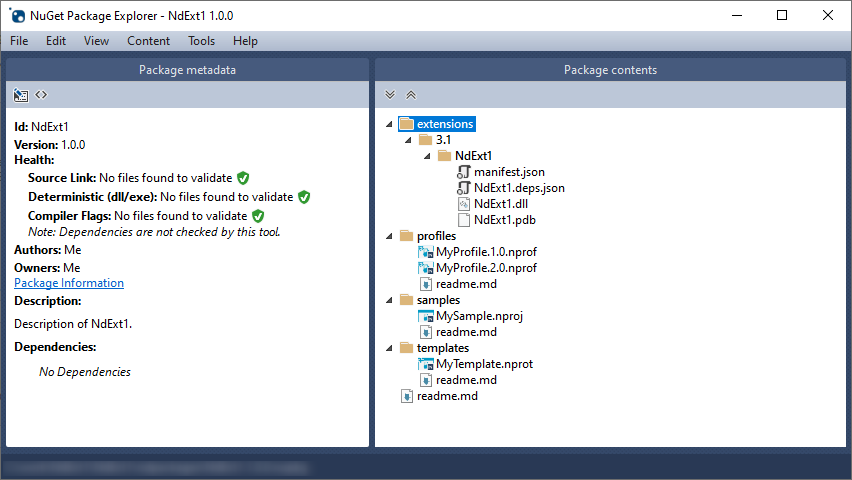
-
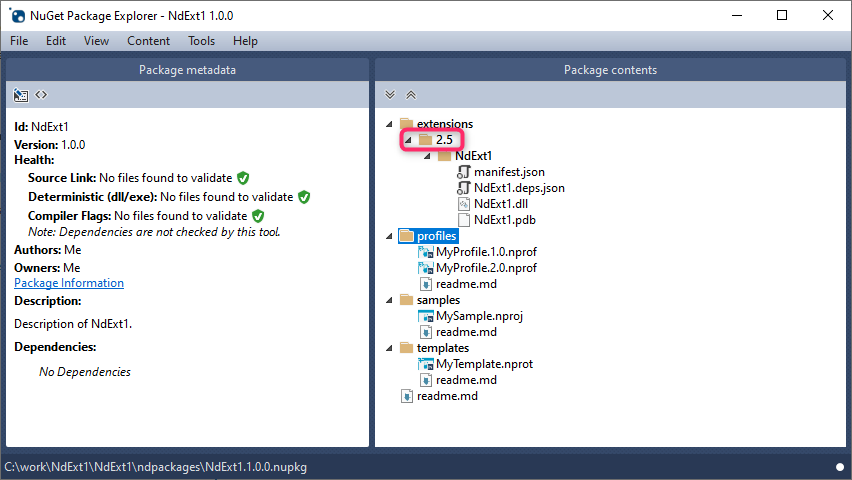
The number under the
extensionsfolder indicates the corresponding Next Design version. The extension binaries to be distributed are placed in its subfolders. -
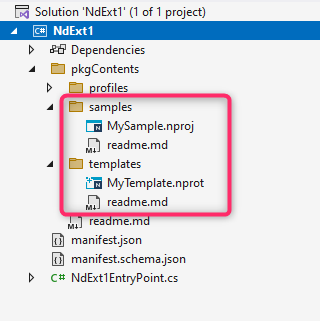
The
samplesandtemplatesfolders are used to register Next Design samples and template functions. When you create a project file withNDExt new, thesamplesandtemplatesfolders are created in thepkgContentsfolder. Place your Next Design project file and template files under these folders. They will be automatically registered in the package when you build it withndext pack. -
You can register and distribute profiles in the package. When you create a project file with
NDExt new, theprofilesfolder is created in thepkgContentsfolder. Place your profile files (.iprof/.nprof) under this folder and its subfolders. There are no rules for placement within the folders, so you can place them anywhere. You can also place multiple profile files, such as different versions. When you build a package withndext pack, it will be automatically registered as a package.
- Please close Next Design during the build process. Packaging may fail if Next Design is running.
- Including Japanese filenames in the package's configuration files (such as sample or template files or documents) will cause the build to fail, so please use English filenames.
Publishing Packages
You can publish your package by adding a Package Source via the [Setting] button in Next Design Extensions and placing the nupkg file. A package source can be a directory or a web server (website) called a NuGet server. Here, we will explain the simplest method: publishing using a folder as the package source.
- Add a package source.
- Click [File] menu > [Packages] to open the [Packages] dialog.
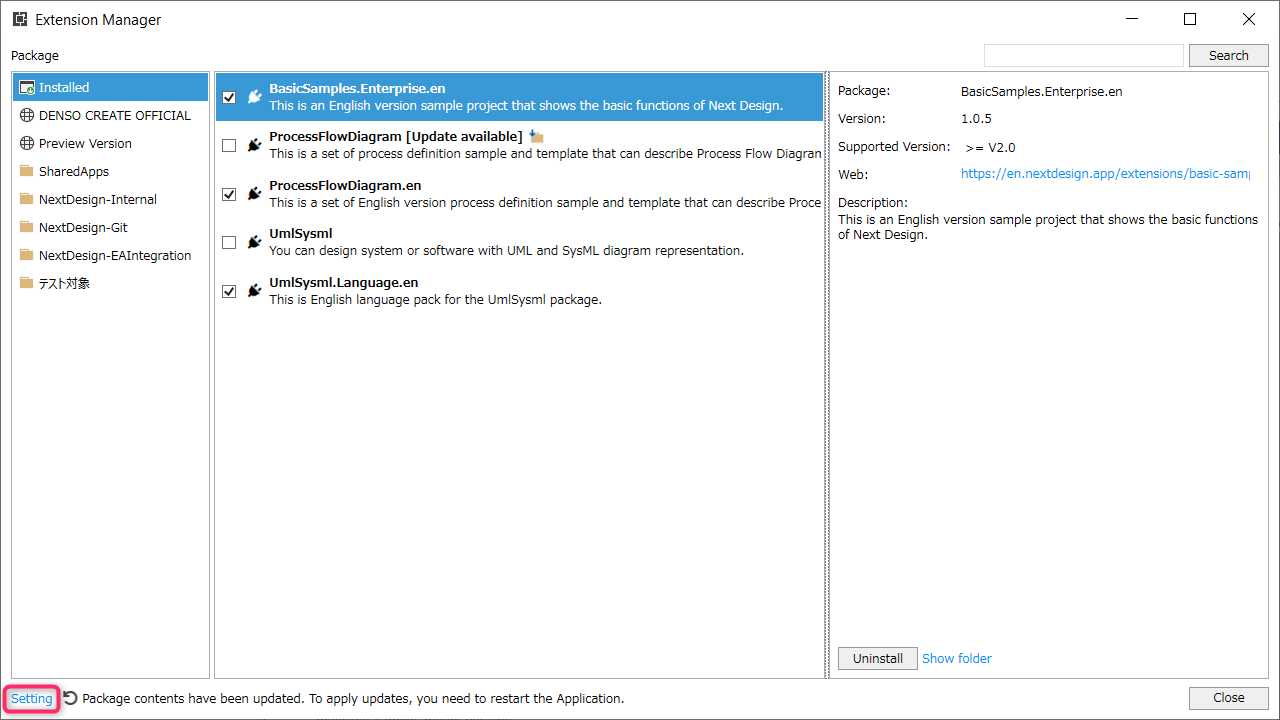
- Click the [Setting] button to display the [Extension Settings] dialog, then click the [Add] button.
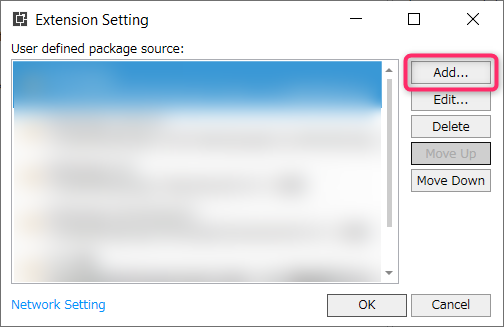
- Specify the folder where the package will be distributed. This can be a network or local folder.

- Copy the package to the package source.
Copy the built nupkg file to the package source folder.
- Distribute the package source information to each user and have them install it as an extension.
This allows you to publish the package as a Next Design extension.
The following methods can be considered for distribution using the package source folder.
- Sharing via a network folder accessible to users
- This is the simplest method for sharing only within your company or organization. Set the network folder containing the
.nupkgfiles as the package source. - Sharing folders via OneDrive, Google Drive, etc.
- This method allows sharing with external networks via the cloud. Create a folder containing the
.nupkgfiles on your cloud drive and share it with multiple users. Each user sets their local drive as the package source. - Publishing using GitHub/GitLab or Subversion
- This is an effective method for easily publishing extensions to multiple users across organizations and networks, especially if you are familiar with Git, etc. Register your local working folder on GitHub or Subversion as the package source.
- Updating to the latest version using configuration management features. To publish new packages to users, they need to update the repository to the latest version, but no special environment is required for publication.
Package Updates
To update a package, update the version number and create a new package. Multiple versions with the same package ID can be stored in the package source folder. 1. Change the Package Version in the project settings to the new version. For example, if it's "1.1.0", change it to "1.2.0".
2. Build the package.
3. Assume the created .nupkg file looks like MyExtA.1.2.0.nupkg. Place this file in the package source folder.
For example, if the file structure in the package source folder is as follows, there are packages MyExtA and MyExtB, each publishing two versions.
packageSource\
MyExtA.1.0.0.nupkg
MyExtA.1.2.0.nupkg
MyExtB.2.0.0.nupkg
MyExtB.2.1.0.nupkg
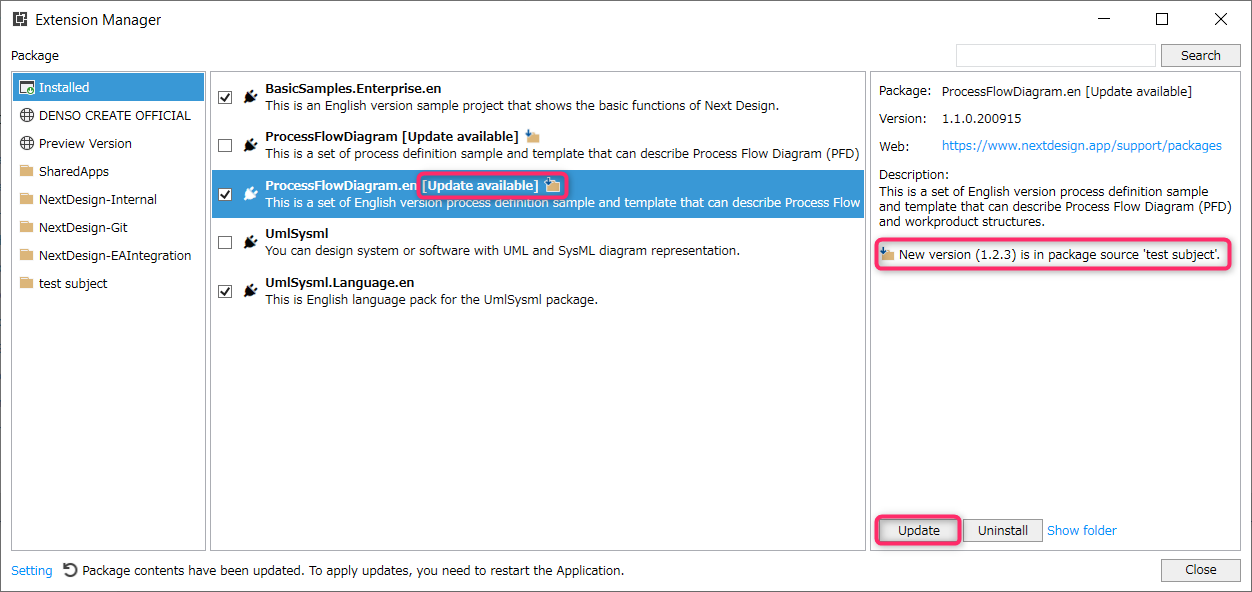
- When you publish a new version, you can see a notification icon on the Next Design status bar indicating that there are packages that can be updated.
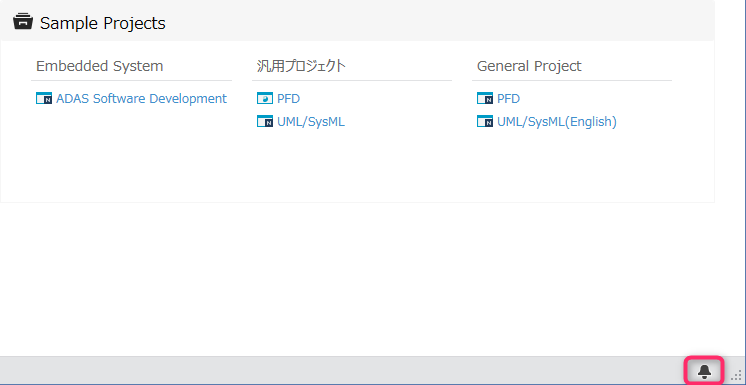
- Clicking the icon displays the [Packages] dialog. You can check the packages that have updates and update them by clicking the [Update] button.
Advanced Topics
This section explains advanced topics related to package distribution.
Registering Projects to Display on the Start Page
By placing sample and template Next Design project files in the pkgContents folder within your created Visual Studio project, you can display them on the Next Design start page.
- Register the sample and template projects you want to display on the start page in the
pkgContentsfolder.
- You do not need to set the file properties to copy to the output directory.
- Both samples and templates create a new copy of the project file. There is no significant difference in operation, but it is recommended to distribute profiles in template format.
Making Packages International
You can set multiple languages for the Title and Description as follows. The system will automatically select the appropriate language and display it in the UI according to the current UI display language.
- Enter the international package information.
In the project settings, enter text for Japanese and English, like this: { "ja" : "Japanese description", "en" : "english here"}. Only the first line is used for the title, while the entire description is used.
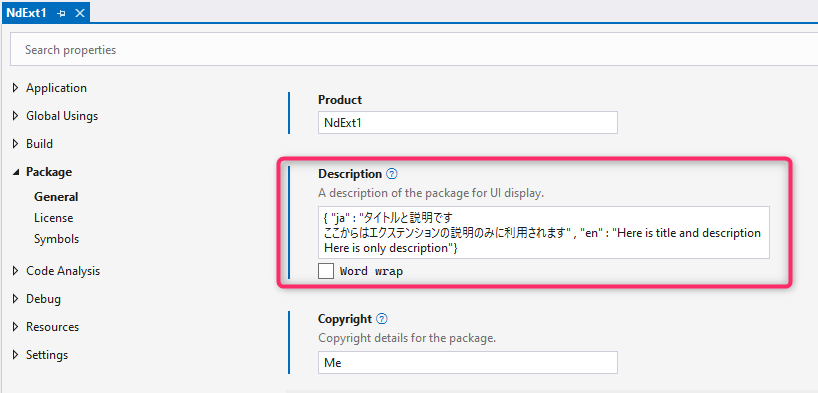
- The package's display text will switch according to the display language of Next Design.
- Note that if you check with NuGet Package Explorer, the
Descriptionwill look like this:
Specifying the Next Design Version
To specify the Next Design version, use the -v argument when building the package. It will work with this version or later.
C:\MyProjects\NdExt1\NdExt1> ndext pack -v 2.5
The build result will look like this:
Setting Up Your Own Package Publishing Server
Next Design package servers comply with the NuGet V2/V3 protocol. To release a server accessible only to a limited number of users, such as within an organization, you need to set up your own NuGet server. For details, see Microsoft's Hosting Your Own NuGet Feeds.
Folder Structure within the Package
To make it work with all app versions, set the number directly under extensions to 2.0.
.\extensions\
2.0\
NdExt1\
sampleExtension.dll
markdig.dll
To support multiple Next Design versions, do the following:
.\extensions\
2.0\
NdExt1\
sampleExtension.dll
markdig.dll
manifest.json
2.5\
NdExt1\
sampleExtension.dll
markdig.dll
manifest.json
To place multiple extensions, arrange them as follows:
.\extensions\
2.0\
NdExt1\
images\
xx.png
ext1.dll
manifest.json
NdExt2\
images\
xx.png
ext2.dll
manifest.json

.\samples\
2.0\
aaa.nproj

.\templates\
2.5\
aaa.nprot
bbb.nprot
Other methods for creating packages using other tools
Next Design packages utilize the NuGet mechanism. Therefore, in addition to using Visual Studio and NDExt, the following methods are available:
- Create a nuspec file directly and package it using the
dotnet packcommand. - Create it using the NuGet Package Explorer