Distributed Development in a Team
Overview
Next Design enables distributed development within a team by splitting models and profiles into separate files.
The following explains how to use the following Next Design features.
| Next Design Features | Overview |
|---|---|
| Splitting and Merging Model Files | Splitting a model in a project into multiple model files enables parallel development within a team. |
| Register Model File | Registering a split model file in another project allows you to share and edit the model file with another project. |
| Export Model File | Exporting a split model file allows you to reuse part of a model in another project. |
| Partial Loading of Model Files | Switching between automatic and manual loading for each split model file prevents unnecessary model file loading and shortens the loading time of large projects. |
| Splitting and Merging Profiles | Splitting a profile from a project allows you to manage models and profiles separately. |
Dividing and Merging Model Files
Dividing into Model Files
To divide a model in a project into multiple model files, follow these steps:
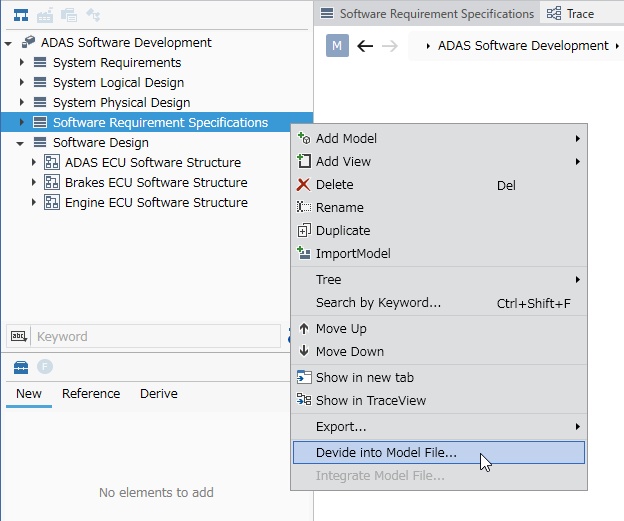
- Select the model you want to divide into model files in the Model Navigator.
- Execute the division into model files using one of the following methods:
- Click [Team Collaboration] > [File] > [Devide into Model File] from the ribbon.
- Click [Devide into Model File] from the context menu.
- If you are dividing only one model into a model file, specify the file name in the [Devide into Model File] dialog box.
(If you select multiple models and divide them into model files, you cannot change the file name.) - Specify a save folder in the [Devide into Model File] dialog box and click the [OK] button.
The folder you specify should be under the [Models] folder in the same folder as the project file. - Once split into model files, the model will be marked with an icon representing the model file.
Then, the model will be stored as an nmdl file (for JSON format) or an imdl file (for database format) in the specified folder.
- Only models with the [Allow model file splitting] checkbox checked in their metamodel can be split into model files.
- If the [Devide into Model File] menu is disabled, check the metamodel definition for that model.
Merging Split Model Files
To merge split model files into a project, follow these steps:
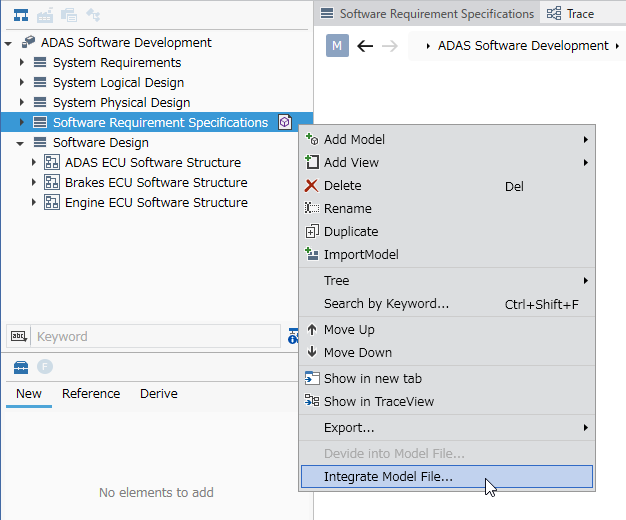
- Select the split model file in the Model Navigator or Project Navigator.
- Merging the model files using one of the following methods:
- From the ribbon, click [Team Collaboration] > [File] > [Integrate Model File].
- From the context menu, click [Integrate Model File].
- Check the confirmation dialog and click the [OK] button.
- Once the model file is integrated into the project, the model file icon will disappear from the model.
Registering a Model File
There are three types of model file registration:
- Register: Registers the model file as a model for your project.
- Import: Copies the model file to your project and registers it.
- Reference Registration: Registers the model file for sharing and editing with another project.
The type of registration is determined by the model file's storage location.
- Register: Under the [Models] folder in the same folder as the project file.
- Import: A folder other than the [Models] folder. This occurs when you select [Import] in the dialog that appears when specifying that folder.
(The model file will be copied to the folder selected when registering the model file.) - Reference Registration: A folder other than the [Models] folder. If you select [Reference] in the dialog that appears when specifying that folder.
(The model file will be displayed directly under the [Model] folder.)
- Please confirm beforehand that the project in which the model file you are registering created is reusing a modularized profile. If you are reusing a profile, refer to Profile Definition > Profile Operation > Output Compatibility Information to Model File and set it to output compatibility information to the model file.
For information on reusing profiles, see the following: - Profile Definition > Profile Operation > Reusing Profile
To register a model file, follow these steps:
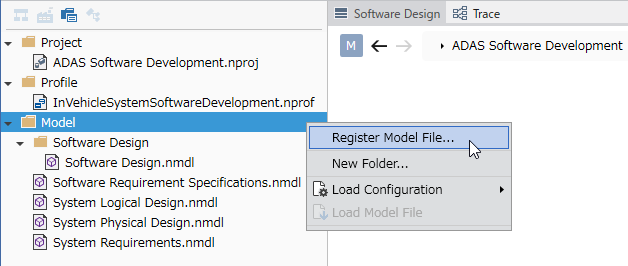
- Open the project to register.
- Switch to the Project Navigator using the selector at the top of the Navigator.
- Select Model or a folder under Model at the top level of the tree.
- Register the model file using one of the following methods:
- Click Team Collaboration > File > Register from the ribbon.
- Click Register Model File from the context menu.
- In the Register Model File dialog box, select the model file (.nmdl or .imdl) and click the Open button.
- If the selected model file is stored outside the Models folder in the same folder as the project file, the Register Model File dialog box appears.
In the Register Model File dialog box, select Import or Reference. - The model file is added to the Project Navigator, and the model is added to the Model Navigator.
- The destination project and the model file must use the same file save format.
- The profile of the destination project must be the same as (or include) the profile that created the model file you are registering. If they are not the same, the design information will not load correctly. A warning message will indicate which design information is no longer available.
- If you are registering a model file by reference, the profile must be the same as (or include) the profile of the project sharing and editing that model file. If they are not the same, the model file's design information will not load correctly. Saving the project in this state may lose design information saved in another project that is sharing the model file.
- For information on exporting and importing profiles, see the following.
- Profile Definition > Profile Operation > Operation Flow
Export Model File
To export a split model file from a project, follow these steps:
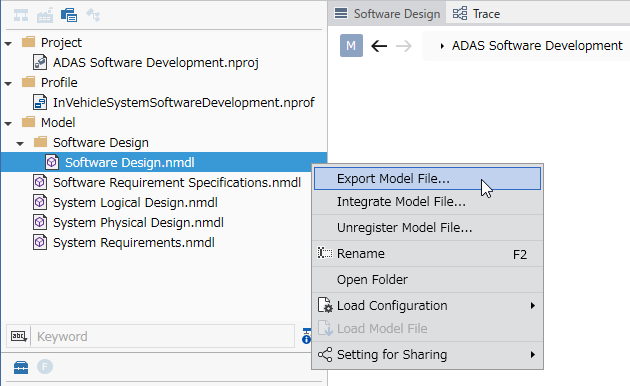
- Switch to Project Navigator using the selector at the top of the Navigator.
- In the Project Navigator, select the model file you want to export.
- Export the model file using one of the following methods:
- Click Team Collaboration > File > Export from the ribbon.
- Click Export Model File from the context menu.
- Select the destination folder and click Save.
- The split model file will be exported and stored in the selected folder.
- To import an exported model file into another project, the profile must be the same.
- For details, see the following:
- Profile Definition > Profile Operation > Operation Flow
Moving Model Files
You can move the storage location of model files in the Project Navigator. To move them, follow these steps:
- Switch to [Project Navigator] using the selector at the top of the Navigator.
- Drag the target model file in the tree and drop it into the destination folder.
- You can change the destination folder structure from the context menu of the folder under [Model], which is displayed at the top level of the tree.
- Folders that do not contain model files registered in the project will not appear in the Project Navigator.
If you create a folder in the Project Navigator but do not store a model file, that folder will not appear the next time you open the project. - Reference-registered model files cannot be moved in the Project Navigator.
- Please save the project after changing the hierarchy or name of a model file.
If you close the project without saving, the change to the model file path will not be saved, and the model file will not be loaded the next time you open the project. - Moving a model file, renaming a file, or deleting a folder cannot be undone.
- If you move a model file using a tool other than Next Design, the model file will not be loaded.
Partially Loading Model Files
Setting a Model File to Manual Load
To set a model file to manual load, follow these steps:
- In the Project Navigator, select the model file you want to switch to manual load.
- From the context menu, select [Load Configuration] > [Set Manual Load].
- A manual load icon will appear to the right of the model file node.
- The next time you open the project, that model file will no longer be automatically loaded.
Returning a Model File to Auto Load
To return a model file to auto load, follow these steps:
- In the Project Navigator, select the model file you want to switch to auto load.
- From the context menu, select [Load Configuration] > [Set Auto Load].
- The manual load icon will disappear from the right of the model file node.
- The next time you open the project, that model file will be automatically loaded.
Loading a Model File Set to Manual Load
When you open a project, model files set to manual load will be unloaded. To manually load an unloaded model file, follow these steps:
- In the Project Navigator, select the model file you want to manually load.
- Select [Load Model File] from the context menu.
- The model file will be loaded.
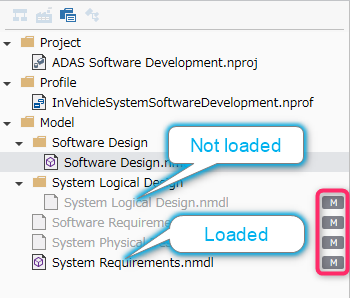
- Model files set as manual nodes are indicated by an "M" icon in the Project Navigator.
- Unloaded model files are indicated by a grayed-out file name in the Project Navigator.
- You can perform the following operations simultaneously for all model files under a folder in the Project Navigator.
- Load Settings
- Load Model File
This operation is performed from the folder's context menu.
- For details on partially loading model files, see the following:
Splitting and Merging Profiles
Splitting Profiles from a Project
To split a profile into files, follow these steps:
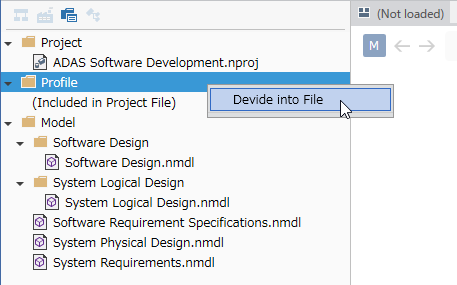
- Switch to [Project Navigator] using the selector at the top of the Navigator.
- Select [Profile] at the top level of the tree.
- Click [Devide into File] from the context menu.
- Once the profile is split into files, it will be stored as .nprof or .iprof files in a [Profile] folder in the same folder as the project file.
- Do not replace a profile split into files (.nprof or .iprof file) with a profile edited in another project.
- When applying a profile from another project, please observe the following:
- Profile Definition > Profile Operation > Operation Flow
Integrating a Profile Split from a Project
To integrate a profile into a project, follow these steps:
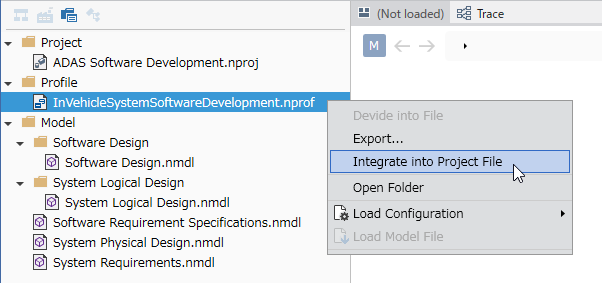
- Switch to [Project Navigator] in the selector at the top of the Navigator.
- Select the profile split into files.
- Click [Integrate into Project File] from the context menu.
- When the profile is integrated into the project, the .nprof or .iprof file in the [Profile] folder will also be deleted.